
5. Models and Databases
Working with databases often requires you to get your hands dirty messing about with SQL. In Django, a lot of this hassle is taken care of for you by Django’s object relational mapping (ORM) functions, and how Django encapsulates databases tables through models. Essentially, a model is a Python object that describes your data model/table. Instead of directly working on the database table via SQL, all you have to do is manipulate the corresponding Python object. In this chapter, we’ll walkthrough how to setup a database and the models required for Rango.
5.1. Rango’s Requirements
First, let’s go over the data requirements for Rango. The following list provides the key details of Rango’s data requirements.
- Rango is a essentially a web page directory - a site containing links to other websites.
- There are a number of different webpage categories, and each category houses a number of links. We assumed in Chapter 1 that this is a one-to-many relationship. See the Entity Relationship Diagram below.
- A category has a name, number of visits, and number of likes.
- A page refers to a category, has a title, URL and a number of views.

Figure 1: The Entity Relationship Diagram of Rango’s two main entities.
5.2. Telling Django About Your Database
Before we can create any models, we must first setup our database configuration. To do this, open the settings.py and locate the dictionary called DATABASES. Now, modify the default key/value pair so it looks something like the following example.
DATABASES = {
    'default': {
        'ENGINE': 'django.db.backends.sqlite3',
        'NAME': DATABASE_PATH,
    }
}
Also create a new variable called DATABASE_PATH and add that to the top of your settings.py along with your other previously defined paths.
DATABASE_PATH = os.path.join(PROJECT_PATH, 'rango.db')
Here, we have defined the default database to use the SQLite Django backend. This provides us with access to the lightweight python database, SQLite, which is great for development purposes.
The only other value we need to set is the NAME key/value pair, which we have set to DATABASE_PATH.
For SQLite databases, the remaining keys of USER, PASSWORD, HOST and PORT are not required and can thus be safely removed.
Note
While using an SQLite engine for this tutorial is fine, it may not perhaps be the best option when it comes to deploying your application. Instead, it may be better to use a more robust and scalable database engine. Django comes with out of the box support for several other popular database engines, such as PostgreSQL and MySQL. See the official Django documentation on Database Engines for more details. You can also check out this excellent article on the SQLite website which explains situation where you should and you shouldn’t consider using the lightweight SQLite engine.
5.3. Creating Models
With your database configured in settings.py, let’s now create the two initial data models for the Rango application.
In rango/models.py, we will define two classes - both of which must inherit from django.db.models.Model. The two Python classes will be the definitions for models representing categories and pages. Define the Category and Page models as follows.
class Category(models.Model):
    name = models.CharField(max_length=128, unique=True)

    def __unicode__(self):
        return self.name

class Page(models.Model):
    category = models.ForeignKey(Category)
    title = models.CharField(max_length=128)
    url = models.URLField()
    views = models.IntegerField(default=0)

    def __unicode__(self):
        return self.title
When you define a model, you need to specify the list of attributes and their associated types along with any optional parameters. Django provides a number of built-in fields. Some of the most commonly used are listed below.
CharField, a field for storing character data (e.g. strings). Specifymax_lengthto provide a maximum number of characters the field can store.URLField, much like aCharField, but designed for storing resource URLs. You may also specify amax_lengthparameter.IntegerField, which stores integers.DateField, which stores a Pythondatetime.date.
Check out the Django documentation on model fields for a full listing.
For each field, you can specify the unique attribute. If set to True, only one instance of a particular value in that field may exist throughout the entire database model. For example, take a look at our Category model defined above. The field name has been set to unique - thus every category name must be unique.
This is useful if you wish to use a particular field as an additional database key. You can also specify additional attributes for each field such as specifying a default value (default='value'), and whether the value for a field can be NULL (null=True) or not.
Django also provides simple mechanisms that allows us to relate models/database tables together. These mechanisms are encapsulated in three further field types, and are listed below.
ForeignKey, a field type that allows us to create a one-to-many relationship.OneToOneField, a field type that allows us to define a strict one-to-one relationship.ManyToManyField, a field type which allows us to define a many-to-many relationship.
From our model examples above, the field category in model Page is of type ForeignKey. This allows us to create a one-to-many relationship with model/table Category, which is specified as an argument to the field’s constructor. You should be aware that Django creates an ID field for you automatically in each table relating to a model. You therefore do not need to explicitly define a primary key for each model. Django makes your life so much easier!
Note
When creating a Django model, it’s good practice to make sure you include the __unicode__() method - a method almost identical to the __str__() method. If you’re unfamiliar with both of these, think of them as methods analogous to the toString() method in a Java class. The method is used to provide a unicode representation of a model instance. Our Category model for example returns the name of the category in the __unicode__() method - something which will be incredibly handy to you when you begin to use the Django admin interface later on in this chapter.
5.4. Creating and Synchronising the Database
With our models defined, we can now let Django work its magic and create the table representations in our database. To do this, we need to synchronise the database using the manage.py script by invoking the following command.
$ python manage.py syncdb
You can then follow the on-screen instructions. You’ll notice that Django creates a number of tables within your selected database. Of particular interest to you are the two tables rango_category and rango_page. These correspond to your two Rango models Category and Page respectively. Check out the example output the script produces below.
$ python manage.py syncdb

Creating tables ...
Creating table auth_permission
Creating table auth_group_permissions
Creating table auth_group
Creating table auth_user_groups
Creating table auth_user_user_permissions
Creating table auth_user
Creating table django_content_type
Creating table django_session
Creating table django_site
Creating table rango_category <-- Rango Category model
Creating table rango_page     <-- Rango Page model

You just installed Django's auth system, which means you don't have any superusers defined.
Would you like to create one now? (yes/no): yes
Username (leave blank to use '<YOUR USERNAME>'): <ENTER A USERNAME>
Email address: <ENTER YOUR E-MAIL ADDRESS>
Password: <ENTER PASSWORD>
Password (again): <ENTER PASSWORD AGAIN>
Superuser created successfully.
Installing custom SQL ...
Installing indexes ...
Installed 0 object(s) from 0 fixture(s)
You may be asked if you wish to create a superuser account, just like in the example above. The superuser account will be used to access the Django admin interface later on in this tutorial, so we recommend that you bite the bullet and set up an account now. Enter yes, then enter a username for the account, your e-mail address and provide a password when prompted. Once completed, the script should finish successfully. Make sure you take a note of the username and password for your superuser account.
After this process has been completed you will be able to see a new file called rango.db in your project directory.
Note
Whenever you change your database models, you will have to delete the database file and then re-sync the database by running python manage.py syncdb again. If you add a new model however, you can syncdb your database without deleting it. This is a known drawback of Django, and can be quite frustrating. New models will by synchronised, but changes to existing models will not be. You may have also noticed that we forgot to include a couple of fields in our Category model. We will add these in later to remind you of this process. One solution to this problem is using a third party application like South that handles schema migrations (changes to models). South is currently in active development and is considered a standard solution for schema migrations until something like this becomes part of the standard Django codebase. However, we won’t be covering South in this book.
5.5. Generated SQL
The database synchronisation process essentially converts the Django models into SQL tables. To see the SQL that is produced, you can run the command python manage.py sql rango. This will output the SQL code that was issued to the database backend on your behalf. Notice that while we did not specify an id attribute in our model, Django automatically assigns an id to every model. You should also note that in the rango_page table, the reference to Category is created as a foreign key.
BEGIN;
CREATE TABLE "rango_category" (
    "id" integer NOT NULL PRIMARY KEY,
    "name" varchar(128) NOT NULL UNIQUE
)
;
CREATE TABLE "rango_page" (
    "id" integer NOT NULL PRIMARY KEY,
    "category_id" integer NOT NULL REFERENCES "rango_category" ("id"),
    "title" varchar(128) NOT NULL,
    "url" varchar(200) NOT NULL,
    "views" integer NOT NULL
)
;

COMMIT;
Since Django provides a wrapper over the database engines all we need to worry about is interfacing with the models (and the Object Relation Mapping). However, you still have the ability to issue SQL commands directly to the database if you wish. This is detailed in the Official Django Documentation on running custom SQL.
5.6. Django Models and the Django Shell
Before we turn our attention to demonstrating the Django admin interface, it’s worth noting that you can interact with Django models from the Django shell - a very useful aid for debugging purposes. We’ll demonstrate how to create a Category instance using this method.
To access the shell, we need to call manage.py from within your Django project’s root directory once more. Run the following command.
$ python manage.py shell
This will start an instance of the Python interpreter and load in your project’s settings for you. You can then interact with the models. The following terminal session demonstrates this functionality. Check out the inline commentary to see what each command does.
# Import the Category model from the Rango application
>>> from rango.models import Category

# Show all the current categories
>>> print Category.objects.all()
[] # Returns an empty list (no categories have been defined!)

# Create a new category object, and save it to the database.
>>> c = Category(name="Test")
>>> c.save()

# Now list all the category objects stored once more.
>>> print Category.objects.all()
[<Category: test>] # We now have a category called 'test' saved in the database!

# Quit the Django shell.
>>> quit()
In the example, we first import the model that we want to manipulate. We then print out all the existing categories, of which there are none because our table is empty. Then we create and save a Category, before printing out all the categories again. This second print should then show the Category just added.
Note
The example we provide above is only a very basic taster on database related activities you can perform in the Django shell. If you have not done so already, it is good time to complete part one of the official Django Tutorial to learn more about interacting with the models. Also check out the official Django documentation on the list of available commands for working with models.
5.7. Configuring the Admin Interface
One of the stand-out features of Django is that it provides a built in, web-based administrative interface that allows us to browse and edit data stored within our models and corresponding database tables. Like everything else, we need to configure the admin interface for use before we can access it.
First, we must open our Django project’s settings.py file. This is located within the project configuration directory. Within the file, locate the INSTALLED_APPS tuple, and uncomment the line which adds django.contrib.admin. The tuple should now look something like the following example. Check out the inline comment to easily spot see the uncommented line.
INSTALLED_APPS = (
    'django.contrib.auth',
    'django.contrib.contenttypes',
    'django.contrib.sessions',
    'django.contrib.sites',
    'django.contrib.messages',
    'django.contrib.staticfiles',
    # Uncomment the next line to enable the admin:
    'django.contrib.admin', # THIS LINE SHOULD NOW BE UNCOMMENTED
    # Uncomment the next line to enable admin documentation:
    # 'django.contrib.admindocs',
        'rango',
)
When this has been done, save the file and synchronise the database. We need to do this as the django.contrib.admin application needs to add some additional database tables in order to function correctly. To synchronise the database, run the syncdb command once more.
$ python manage.py syncdb
You should see that the table django_admin_log is created for you. Once done, open your project’s urls.py file. This was created in the project configuration directory. Within the file, first uncomment the two lines after the import statements. We also need to ensure that the URL pattern for /admin/ is present, and points to the admin.site.urls module as shown below.
from django.conf.urls import patterns, include, url
from django.conf import settings

# Uncomment the next two lines to enable the admin:
from django.contrib import admin # UNCOMMENT THIS LINE
admin.autodiscover() # UNCOMMENT THIS LINE, TOO!

urlpatterns = patterns('',
        url(r'^rango/', include('rango.urls')),
        url(r'^admin/', include(admin.site.urls)), # ADD THIS LINE
        )

if settings.DEBUG:
        urlpatterns += patterns(
                'django.views.static',
                (r'media/(?P<path>.*)',
                'serve',
                {'document_root': settings.MEDIA_ROOT}), )
We’re almost there! Next, we need to now tell the Django admin application what models we wish to make available to the admin interface. To do this, you will need to create a new python file in rango application directory called admin.py. Add the following code to the new file.
from django.contrib import admin
from rango.models import Category, Page

admin.site.register(Category)
admin.site.register(Page)
This will register the models with the admin interface. If we were to have another model, it would be a trivial case of calling the admin.site.register() function, passing the model in as a parameter.
With all of these changes made, start or restart the Django development server and visit: http://127.0.0.1:8000/admin/. You should then see a login box, prompting you for a username and password. Enter the superuser username and password you created when setting up your database, and you should then see a webpage similar to that shown in Figure 2.

Figure 2: The Django admin interface. Note the Rango category, and the two models contained within.
Try clicking the Categorys link within the Rango section. From here, you should see the test category that we created via the Django shell. Try deleting the category as we’ll be populating the database with a population script next. The interface is easy to use. Spend a few minutes creating, modifying and deleting both categories and pages. You can also add new users who can login to the Django admin interface for your project by adding a user to the User in the Auth application.
Note
Note the typo within the admin interface (categorys, not categories). This problem can be fixed by adding a nested Meta class into your model definitions with the verbose_name_plural attribute. Check out Django’s official documentation on models for more information.
Note
The example admin.py file for our Rango application is the most simple, functional example available. There are many different features which you can use in the admin.py to perform all sorts of cool customisations, such as changing the way models appear in the admin interface. For this tutorial, we’ll stick with the bare-bones admin interface, but you can check out the official Django documentation on the admin interface for more information if you’re interested.
5.8. Creating a Population Script
It’s highly likely that during the course of development, you’ll come to a point where you will need to modify a Django model. When you do this, the easiest option - without external software - is to re-create your entire database and run python manage.py syncdb ...again! Since this slow and repetitive task can be such a pain, it’s good practice to create what we call a population script for your database. This script is designed to automatically populate your database with test data for you, which can potentially save you lots of time.
To create a population script for Rango’s database, we start by creating a new Python module within our Django project’s root directory (e.g. <workspace>/tango_with_django_project/). Create the populate_rango.py file and add the following code.
import os

def populate():
    python_cat = add_cat('Python')

    add_page(cat=python_cat,
        title="Official Python Tutorial",
        url="http://docs.python.org/2/tutorial/")

    add_page(cat=python_cat,
        title="How to Think like a Computer Scientist",
        url="http://www.greenteapress.com/thinkpython/")

    add_page(cat=python_cat,
        title="Learn Python in 10 Minutes",
        url="http://www.korokithakis.net/tutorials/python/")

    django_cat = add_cat("Django")

    add_page(cat=django_cat,
        title="Official Django Tutorial",
        url="https://docs.djangoproject.com/en/1.5/intro/tutorial01/")

    add_page(cat=django_cat,
        title="Django Rocks",
        url="http://www.djangorocks.com/")

    add_page(cat=django_cat,
        title="How to Tango with Django",
        url="http://www.tangowithdjango.com/")

    frame_cat = add_cat("Other Frameworks")

    add_page(cat=frame_cat,
        title="Bottle",
        url="http://bottlepy.org/docs/dev/")

    add_page(cat=frame_cat,
        title="Flask",
        url="http://flask.pocoo.org")

    # Print out what we have added to the user.
    for c in Category.objects.all():
        for p in Page.objects.filter(category=c):
            print "- {0} - {1}".format(str(c), str(p))

def add_page(cat, title, url, views=0):
    p = Page.objects.get_or_create(category=cat, title=title, url=url, views=views)[0]
    return p

def add_cat(name):
    c = Category.objects.get_or_create(name=name)[0]
    return c

# Start execution here!
if __name__ == '__main__':
    print "Starting Rango population script..."
    os.environ.setdefault('DJANGO_SETTINGS_MODULE', 'tango_with_django_project.settings')
    from rango.models import Category, Page
    populate()
While this looks like a lot of code, what it does is relatively simple. As we define a series of functions at the top of the file, code execution begins towards the bottom - look for the line if __name__ == '__main__'. We then import Rango’s settings and our models Category and Page and call the populate() function.
Warning
When importing Django models, make sure you have imported your project’s settings by that stage. If you don’t, an exception will be raised. This is why we import Category and Page towards the end of the population script, rather than at the top.
The populate() function is responsible for the calling the add_cat() and add_page() functions, who are in turn responsible for the creation of new categories and pages respectively. populate() keeps tabs on category references for us as we create each individual Page model instance and store them within our database. Finally, we loop through our Category and Page models to print to the user all the Page instances and their corresponding categories.
Note
We make use of the convenience get_or_create() function for creating model instances. Check out the official Django documentation for more information on this function. The documentation will explain why we pass index [0] of the function’s returned value!
When saved, we can run the script by changing the current working directory in a terminal to our Django project’s root and executing the module with the command $ python populate_rango.py. You should then see output similar to that shown below.
$ python populate_rango.py
Starting Rango population script...
- Python - Official Python Tutorial
- Python - How to Think like a Computer Scientist
- Python - Learn Python in 10 Minutes
- Django - Official Django Tutorial
- Django - Django Rocks
- Django - How to Tango with Django
- Other Frameworks - Bottle
- Other Frameworks - Flask
Now let’s verify that the population script populated the database. Restart the Django development server, navigate to the admin interface, and check that you have some new categories and pages. Do you see all the pages if you click Pages, like in Figure 3?
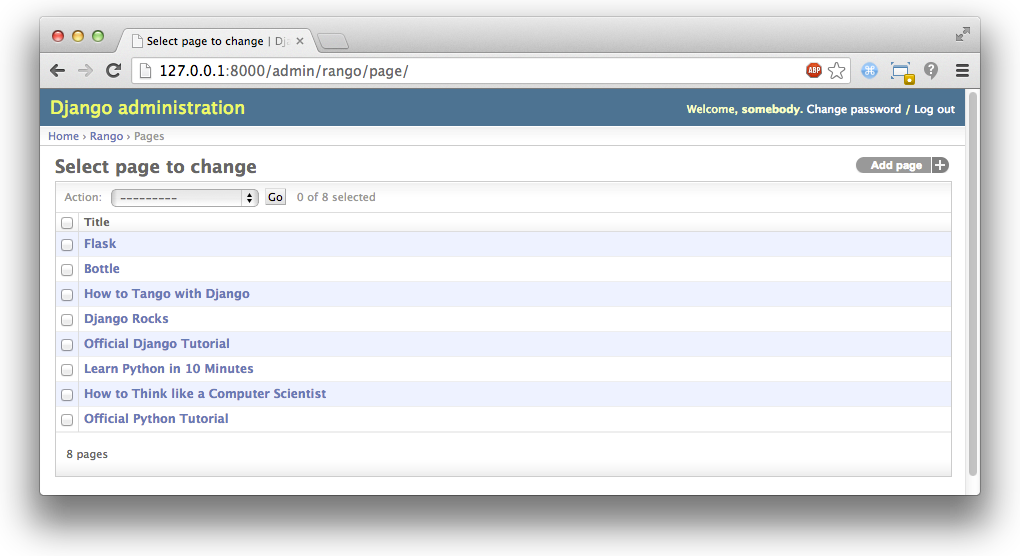
Figure 3: The Django admin interface, showing the Page table populated with sample data from our population script.
A population script takes a bit of time to write but if you ever change your models, you’ll be glad you have it. Remember to update your population script when you update your models too - you don’t want the two to get out of sync with each other.
5.9. Basic Workflows
Now that we’ve covered the core principles of dealing with Django’s models functionality, now is a good time to summarise the processes involved in setting everything up. We’ve split the core tasks into separate sections for you.
5.9.1. Setting up your Database
With a new Django project, you should first tell Django about the database you intend to use (i.e. configure DATABASES in settings.py). Without doing so, Django won’t have anywhere to store your data. You can also enable the admin interface to make your life a little bit easier - and remember, you can always disable it later if you want to.
5.9.2. Adding a Model
The workflow for adding models can be broken down into five steps.
- First, create your new model(s) in your Django application’s
models.pyfile. - With the model created, reconfigure the admin interface to include your new model(s), if you are using it.
- You should then synchronise or resynchronise your database with the
$ python manage.py syncdbcommand. This will create the necessary infrastructure within the database for your new model(s). - Create/Edit and then run your population script for your new model(s).
You should also remember about the nuances of the syncdb command. Note that the command can be used only for adding new models to your database - if you wish to amend an existing model, you must recreate the database.
5.10. Exercises
Now that you’ve completed the chapter, try out these exercises to reinforce and practice what you have learnt.
- Update the Category model to include the additional attributes,
viewsandlikeswhere the default value is zero. - Re-sync your database, and update your population script so that the Python category has 128 views and 64 likes, the Django category has 64 views and 32 likes, and the Other Frameworks category has 32 views and 16 likes.
- Undertake the part two of official Django tutorial if you have not done so. This will help to reinforce further what you have learnt here, and to learn more about customising the admin interface.
- Customise the Admin Interface - so that when you view the Page model it displays in a list the category, the name of the page and the url.
5.10.1. Hints
If you require some help or inspiration to get these exercises done, these hints will hopefully help you out.
- To customise the admin interface, you will need to edit
rango/admin.pyand create aPageAdminclass that inherits fromadmin.ModelAdmin. - Within your new
PageAdminclass, addlist_display = ('title', 'category', 'url'). - Finally, register the
PageAdminclass with Django’s admin interface. You should modify the lineadmin.site.register(Page). Change it toadmin.site.register(Page, PageAdmin)in Rango’sadmin.pyfile.
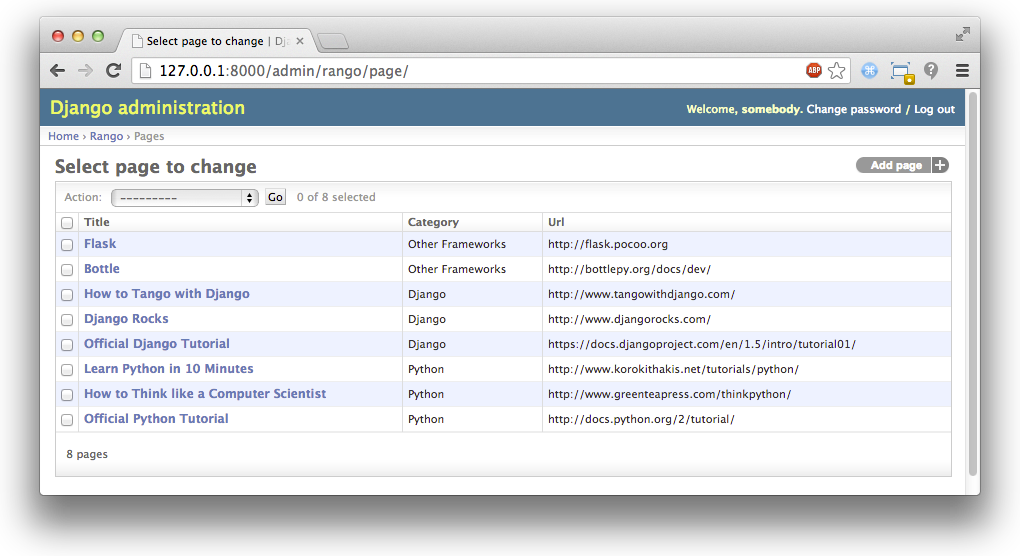
Figure 4: The updated admin interface page view, complete with columns for category and URL.